
My honey bought this 1800's, dome top, trunk for me when we first moved in together. It was something that he found on his own and knew that I would love. It's been filled with mementos that have been accumulating over our many years together.
I decided that it was ready for me to give it a makeover!

I took this pic of it just after I had roughed it up, a bit, with a light sand block.
I decided that it was ready for me to give it a makeover!
I took this pic of it just after I had roughed it up, a bit, with a light sand block.

This was the ugly, yellow, burlap lining that someone chose back in the mid 1900's.

This was what I found underneath...a layer of old grey/blue/green paint...

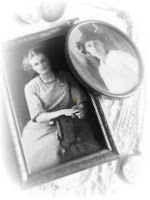
and a Victorian, lady label!

Now, on with it's makeover...this is the fabric and trim that I chose to re-line it with.


I'm always looking to get a project done quickly and take all the shortcuts and easy ways to get things done, as long as it isn't something that I am looking to sell!
I started at the front edge of the trunk (without even cutting the fabric).
I fit one salvage edge of the fabric into the corner of the trunk.
I turned the fabric under, to fit along the bottom of the trunk and stapled in in place as I went along continuing it up to the other side.

Then I made a cut of the fabric along the top, following the frame, folded it under and stapled it into place.

At the next corner I marked a line (with a thin marker) and then cut the rest of the fabric all the way down, along the bottom and back up to the front of the trunk and then cut it and stapled away.

Then, all I had to do was to cut the two sides to fit and staple them in as well.
You may chose to measure each section and cut and staple as you go....I just chose to be imperfect and cheat!
And finally, I just hot glued the trim into place.

I just wish that I knew it's story!

I spent hours going through our old cards and letters and reminiscing my way through old keepsakes before putting it all back inside.

And guess what? I even found a long lost cameo inside. It belonged to my mentor, my dear, sweet Grandma Bea!

If you haven't met her, you can meet her here...
Beatrice Lillian Knuckey/Farnum

Okay, now, here is what I teased you with in my last post...
a little peek of the outside.

Prior to my painting, I used my gold, rub and buff on all of it's steel accent pieces for a little bit of glam.

Then, I dry brushed on my mix of white, chalk paint and wet distressed it to give it some appealing age and finished it with two coats of clear, paste wax.
(Wet distressing is to use a damp rag, gently, about a half an hour after the paint has set. Waiting too long will not work and too soon might take off more than you would like, so proceed with caution and try a small area first.)

A brief history.....
*
*
*
*
Okay, are you ready?
I
think
I've
made
you
wait
long
enough!!!
*
*
*
*
*
So, here it is!
Then, I dry brushed on my mix of white, chalk paint and wet distressed it to give it some appealing age and finished it with two coats of clear, paste wax.
(Wet distressing is to use a damp rag, gently, about a half an hour after the paint has set. Waiting too long will not work and too soon might take off more than you would like, so proceed with caution and try a small area first.)
A brief history.....
This trunk was commonly called a ladies barrel back, dome top, camel back, or steamer trunk.
This design was first made in the early 1800’s in Europe with this model being around 1869-70
The top was designed to prevent other luggage from being stacked atop them when used in traveling by ship to America, only the most elite people could afford to buy a camel back top trunk.
It's design was continued in America because when the dome top was covered with tin it shed water well when traveling by stagecoach.
**
*
*
*
Okay, are you ready?
I
think
I've
made
you
wait
long
enough!!!
*
*
*
*
*
So, here it is!
It has a brand new, shabby look and I love it now more than ever!

It's back in place at the foot of our old bed waiting for some new additions to be tucked inside.
It's back in place at the foot of our old bed waiting for some new additions to be tucked inside.

This was my "teaser" collage that I shared with you...I'm preparing my next post of our iron bed's re-do and other projects and vignettes from around the room.

And here's one last teaser of the bed in our romantic retreat.

I'm sorry that you'll have to wait, 'til next week, to see it all...but,
I think it will be worth checking back in on!
Love, Hugs and Kisses,
JP
JP
and Gucci, too!
Can you see him? He's playing "peek-a-boo!

A very special "thank you" to
adelightsomelife
and
rootedinthyme for featuring this makeover in their blogs!
Sharing this post at these great parties
kathewithane
mariaelenasdecor
dwellings-theheartofyourhome
lifeonlakeshoredrive
onemoretimeevents
romantichome
thecharmofhome
craftberrybush
myuncommonsliceofsuburbia
frenchcountrycottage
cedarhillfarmhouse
craftsalamode
rootedinthyme
commonground
nominimalisthere
staceyembracingchange
adelightsomelife
ivyandelephants
savvysouthernstyle
diybydesign
knickoftime kathewithane
mariaelenasdecor
dwellings-theheartofyourhome
lifeonlakeshoredrive
onemoretimeevents
romantichome
thecharmofhome
craftberrybush
myuncommonsliceofsuburbia
frenchcountrycottage
cedarhillfarmhouse
craftsalamode
rootedinthyme
commonground
nominimalisthere
staceyembracingchange
adelightsomelife
ivyandelephants
savvysouthernstyle
diybydesign
7 comments:
Looks great!
Sweet trunk! Love it, especially the interior makeover! Wow!!!
What a lovely transformation. It looks so chic and elegant. You have great vision. Happy Thursday! xo
I really love the transformation--great job!
This is a wonderful transformation. I love the lining fabric you used - so very vintage and pretty. Thank you so much for sharing it at Share It One MOre Time. Cathy
Awesome trunk JP, I love how you transformed it - I will be featuring your post in this week's Home and Garden Thursday,
Kathy
What a beautiful trunk makeover! Thank you for joining HSH!
Post a Comment